
Complete Guide to Installing Python on Windows, macOS, and Linux
In this episode, you will learn:
By the end of this tutorial, your system will be fully ready for learning AI and building Python projects. Perfect for beginners with no prior programming experience.
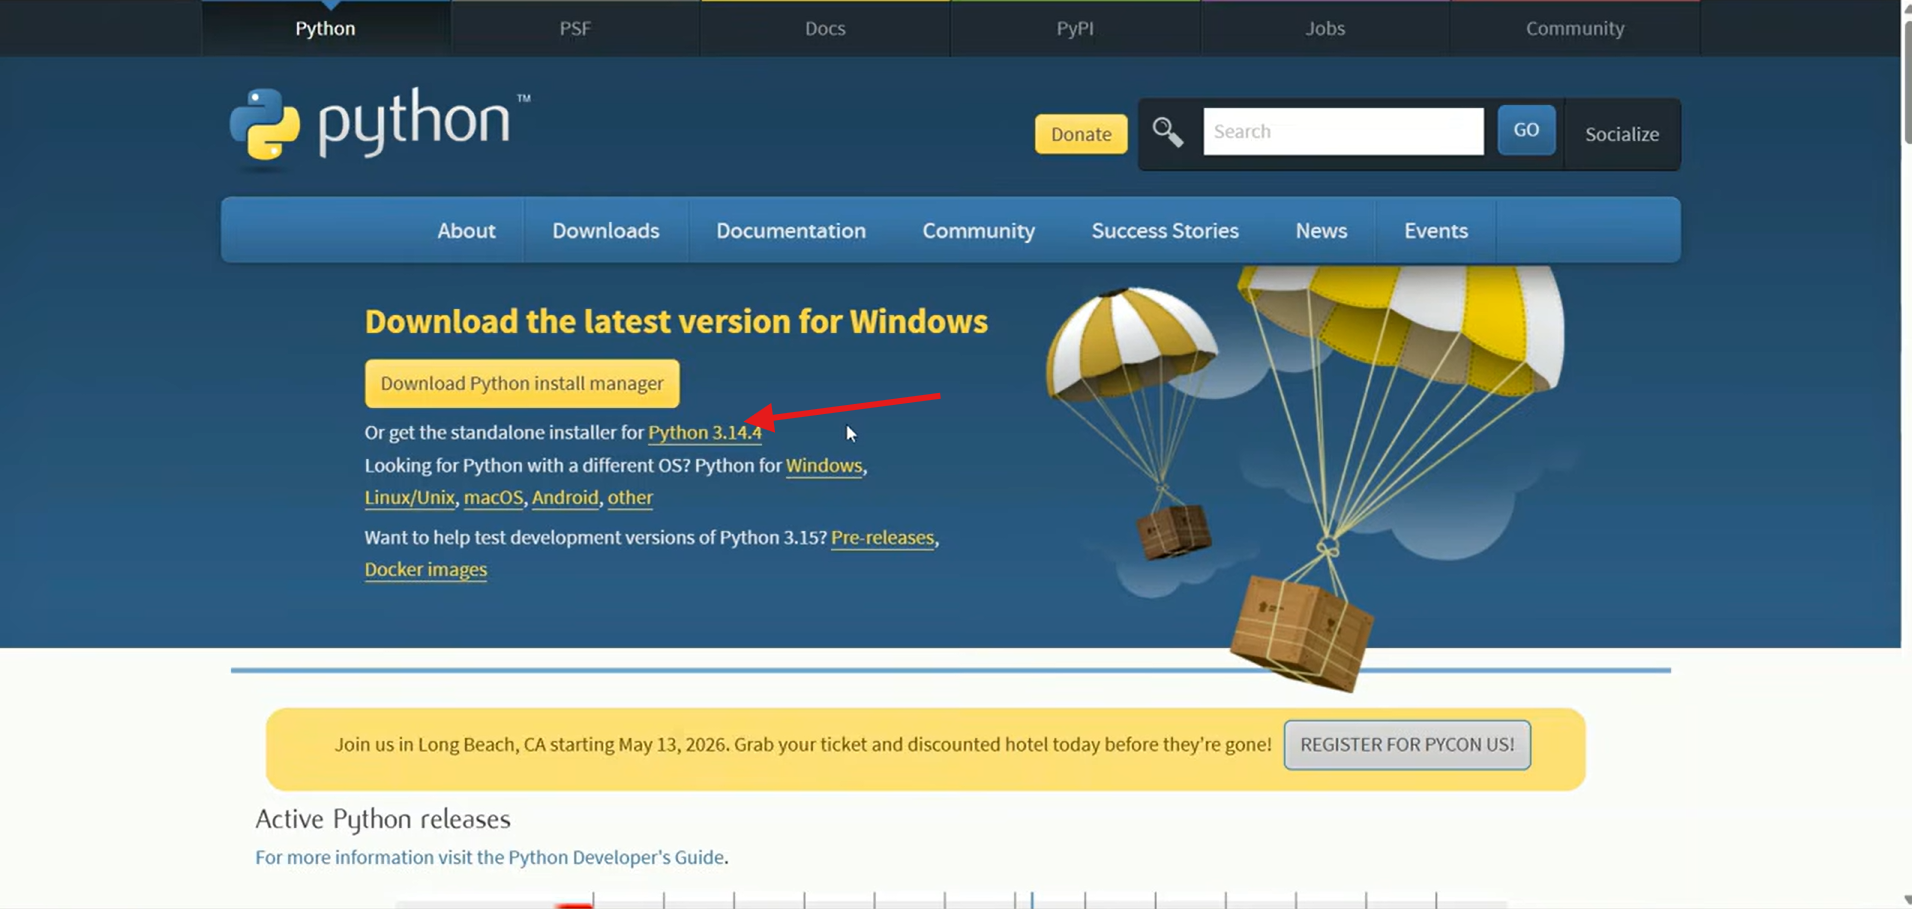
Step 1: Download Python
Visit the official Python website:
Usually, the website automatically suggests the correct installer.
Example:
Image
image showing python official website
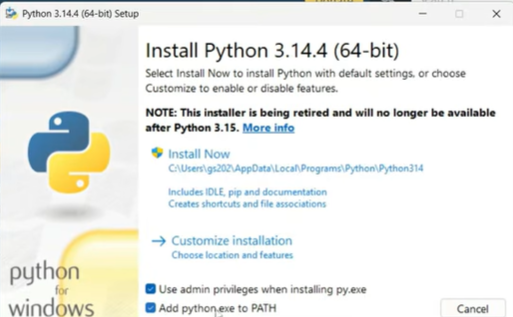
Step 2: Run the Installer
After downloading:
Add Python to PATH
Install Now
Python and pip will install automatically.
Image
image showing installation screen
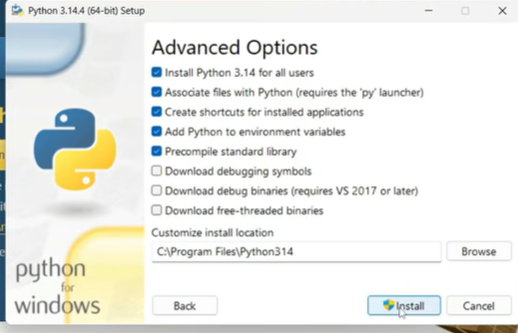
tick the checkboxes as shown
click on customize installation
click next after that
Image
Step 3: Verify Installation
Open:
Command Prompt
Type:
python --version
or
python3 --version
Expected output:
Python 3.x.x
Step 4: Verify pip
Type:
pip --version
Expected:
pip x.x from ...
Step 5: Run Your First Python Program
Open Command Prompt and type:
python
Then:
print("Hello World")
Output:
Hello World
Exit using:
exit()
Installing Python on macOS
Method 1: Install from Official Website (Recommended)
Visit:
Download the latest macOS installer.
Step 2: Install Python
.pkg fileStep 3: Verify Installation
Open:
Terminal
Type:
python3 --version
Expected output:
Python 3.x.x
Step 4: Verify pip
Type:
pip3 --version
Optional: Install Using Homebrew
If you use Homebrew:
Install Homebrew:
Then install Python:
brew install python
Verify:
python3 --version
Installing Python on Linux
Most Linux distributions already include Python.
Check Existing Python Version
Open Terminal:
python3 --version
If installed, you will see:
Python 3.x.x
Ubuntu / Debian Installation
Update packages:
sudo apt update
Install Python:
sudo apt install python3
Install pip:
sudo apt install python3-pip
Verify:
python3 --versionpip3 --version
Fedora Installation
Install Python:
sudo dnf install python3
Install pip:
sudo dnf install python3-pip
Arch Linux Installation
Install Python:
sudo pacman -S python
Running Python on Linux
Start Python:
python3
Example:
print("Hello Linux")
Exit:
exit()
Installing a Code Editor for Python
A code editor makes programming easier.
Recommended Editors
1. Visual Studio Code
Official website:
Features:
Install the Python extension after installing VS Code.
Install VS Code on Windows
Use the Windows installer
C:\Users\{Username}\AppData\Local\Programs\Microsoft VS Code.Install VS Code on macOS
.dmg fileVisual Studio Code.app to the Applications folderLaunch VS Code from the command line
To run VS Code from the terminal by typing code, add it to the $PATH environment variable using one of the following methods:
Configure the path with VS Code
$PATH value to take effect.You can now type 'code .' in any folder to start editing files in that folder.Note
If you still have the old code alias in your .bash_profile (or equivalent) from an early VS Code version, remove it and replace it by running the Shell Command: Install 'code' command in PATH command.
Manually configure the path
To manually add VS Code to your path:
cat << EOF >> ~/.zprofile # Add Visual Studio Code (code) export PATH="\$PATH:/Applications/Visual Studio Code.app/Contents/Resources/app/bin" EOF
cat << EOF >> ~/.bash_profile # Add Visual Studio Code (code) export PATH="\$PATH:/Applications/Visual Studio Code.app/Contents/Resources/app/bin" EOF
The leading slash \ is required to prevent $PATH from expanding during the concatenation. Remove the leading slash if you want to run the export command directly in a terminal.
Install VS Code on Linux
Debian and Ubuntu based distributions
sudo apt install ./<file>.deb # If you're on an older Linux distribution, you will need to run this instead: # sudo dpkg -i <file>.deb # sudo apt-get install -f # Install dependencies
Other binaries are also available on the VS Code download page.
echo "code code/add-microsoft-repo boolean true" | sudo debconf-set-selections
sudo apt install wget gpg && wget -qO- https://packages.microsoft.com/keys/microsoft.asc | sudo gpg --dearmor -o /usr/share/keyrings/microsoft.gpg
/etc/apt/sources.list.d/vscode.sources file with the following contents to add a reference to the upstream package repository:TextTypes: deb URIs: https://packages.microsoft.com/repos/code Suites: stable Components: main Architectures: amd64,arm64,armhf Signed-By: /usr/share/keyrings/microsoft.gpg
sudo apt update && sudo apt install code # or code-insiders
Note
Due to the manual signing process and the publishing system we use, the Debian repo could lag behind by up to three hours and not immediately get the latest version of VS Code.
RHEL, Fedora, and CentOS based distributions
We currently ship the stable 64-bit VS Code for RHEL, Fedora, or CentOS based distributions in a yum repository.
sudo rpm --import https://packages.microsoft.com/keys/microsoft.asc && echo -e "[code]\nname=Visual Studio Code\nbaseurl=https://packages.microsoft.com/yumrepos/vscode\nenabled=1\nautorefresh=1\ntype=rpm-md\ngpgcheck=1\ngpgkey=https://packages.microsoft.com/keys/microsoft.asc" | sudo tee /etc/yum.repos.d/vscode.repo > /dev/null
dnf (Fedora 22 and above):BashOr on older versions using yum:Bashdnf check-update && sudo dnf install code # or code-insiders
yum check-update && sudo yum install code # or code-insiders
Note
Due to the manual signing process and the publishing system we use, the yum repo could lag behind by up to three hours and not immediately get the latest version of VS Code.
Snap
VS Code is officially distributed as a Snap package in the Snap Store
You can install it by running:
Bash
sudo snap install --classic code # or code-insiders
Once installed, the Snap daemon takes care of automatically updating VS Code in the background. You get an in-product update notification whenever a new update is available.
Note
If snap isn't available in your Linux distribution, check the Installing snapd guide, which can help you get that set up.
Learn more about snaps from the official Snap Documentation.
openSUSE and SLE-based distributions
The yum repository mentioned previously also works for openSUSE and SLE-based systems.
sudo rpm --import https://packages.microsoft.com/keys/microsoft.asc && echo -e "[code]\nname=Visual Studio Code\nbaseurl=https://packages.microsoft.com/yumrepos/vscode\nenabled=1\nautorefresh=1\ntype=rpm-md\ngpgcheck=1\ngpgkey=https://packages.microsoft.com/keys/microsoft.asc" | sudo tee /etc/zypp/repos.d/vscode.repo > /dev/null
sudo zypper install code
AUR package for Arch Linux
There is a community-maintained Arch User Repository package for VS Code.
To get more information about the installation from the AUR, consult the following wiki entry: Install AUR Packages.
Nix package for NixOS (or any Linux distribution using Nix package manager)
There is a community-maintained VS Code Nix package in the nixpkgs repository.
To install it by using Nix:
allowUnfree option to true in your config.nixnix-env -i vscode
Install the .rpm package manually
You can manually download and install the VS Code .rpm package (64-bit), however, auto-updating won't work unless the repository above is installed.
Once downloaded, the .rpm package can be installed by using your package manager, for example with dnf:
Bash
sudo dnf install <file>.rpm
Note
Other binaries are also available on the VS Code download page.
Updates
VS Code ships weekly and you can see when a new release is available by checking the release notes. If the VS Code repository was installed correctly, then your system package manager should handle auto-updating in the same way as other packages on the system.
Note
Updates are automatic and run in the background for the Snap package.
Configure VS Code as the default text editor
xdg-open
You can set the default text editor for text files (text/plain) that is used by xdg-open with the following command:
Bash
xdg-mime default code.desktop text/plain
Debian alternatives system
Debian-based distributions allow setting a default editor by using the Debian alternatives system, without concern for the MIME type. You can set this by running the following command and selecting code:
Bash
sudo update-alternatives --set editor /usr/bin/code
If you've installed VS Code with the Snap package, use this command instead:
Bash
sudo update-alternatives --set editor /snap/bin/code
If VS Code doesn't show up as an alternative to the default editor, you need to register it:
Bash
sudo update-alternatives --install /usr/bin/editor editor $(which code) 10
Use the custom title bar
The custom title bar provides many benefits, including great theming support and better accessibility through keyboard navigation and screen readers. These benefits might not always translate as well to the Linux platform. Linux has various desktop environments and window managers that can make the VS Code theming look foreign to users. Therefore, the custom title bar isn't enabled by default on Linux.
For users needing the accessibility improvements, we recommend enabling the custom title bar when running in accessibility mode using a screen reader.
You can manually configure the title bar with the Window: Title Bar Style (window.titleBarStyle) setting:
2. PyCharm
Official website:
Features:
Common Installation Problems
1. “python is not recognized”
Cause:
Fix:
Add Python to PATH
2. pip not working
Try:
python -m pip install package_name
or:
python3 -m pip install package_name
3. Multiple Python Versions
Check versions:
python --versionpython3 --version
Use:
python3 on Linux/macOSpython on WindowsConclusion
Installing Python is simple on all major operating systems.
Steps summary:
Python is beginner-friendly and extremely powerful for modern technologies like AI, web development, cybersecurity, and automation.
Sources:
Python Documentation
Vscode Documentation
Written by Chakradhar on May 11, 2026